
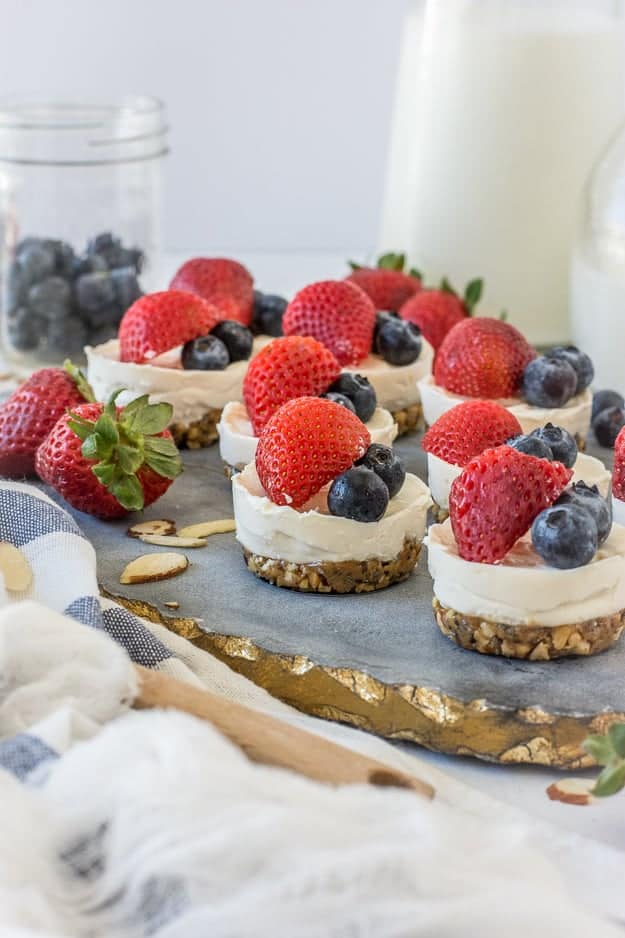
Creamy, dreamy, and completely irresistible – these No-Bake Mini Cheesecakes are the perfect individual dessert for parties, potlucks, or simply treating yourself!
There's something magical about mini desserts – they're cute, perfectly portioned, and somehow taste even better than their full-sized counterparts. These No-Bake Mini Cheesecakes are the ultimate crowd-pleaser: a buttery graham cracker crust topped with a silky, mousse-like cream cheese filling that sets perfectly in the fridge. Best of all, they require no oven – just a little mixing, chilling, and you're done!
Whether you're hosting a summer barbecue, bringing a dessert to a potluck, or just craving something sweet and creamy, these No-Bake Mini Cheesecakes are the answer. They're make-ahead friendly, endlessly customizable with your favourite toppings, and so easy that even beginner bakers can nail them on the first try. Let's get started!
🧀 Ingredients
For the Graham Cracker Crust (makes 24 mini cheesecakes):
- 2 cups (240g) graham cracker crumbs (about 14-16 full sheets)[reference:0][reference:1]
- ⅓ cup (67g) packed light or dark brown sugar[reference:2][reference:3]
- ½ cup (113g) unsalted butter, melted[reference:4][reference:5]
For the Creamy Cheesecake Filling:
- 1 cup (240ml) cold heavy cream (35% fat)[reference:6][reference:7]
- 16 oz (452g) full-fat brick cream cheese, softened to room temperature[reference:8][reference:9]
- ⅓ cup (67g) granulated sugar[reference:10][reference:11]
- 2 tbsp sour cream or plain yogurt, room temperature[reference:12][reference:13]
- 1 tsp fresh lemon juice[reference:14][reference:15]
- ½ tsp pure vanilla extract[reference:16][reference:17]
Optional Toppings:
- Fresh berries (strawberries, blueberries, raspberries)[reference:18]
- Fruit compote or pie filling (cherry, strawberry, blueberry)[reference:19]
- Lemon curd[reference:20]
- Chocolate ganache or caramel sauce[reference:21]
- Whipped cream[reference:22]
- Crushed cookies or nuts[reference:23]
👩🍳 Step‑by‑Step Instructions
Step 1: Prepare the crust
- Line two standard 12-count muffin pans with paper cupcake liners[reference:24].
- In a medium bowl, combine the graham cracker crumbs and brown sugar. Add the melted butter and stir until the mixture resembles wet sand[reference:25].
- Spoon about 1½ tablespoons of the crust mixture into each liner and press it down firmly with the back of a spoon or the bottom of a small glass[reference:26].
- (Optional but recommended) Bake the crusts at 175°C (350°F) for 5 minutes to help them firm up[reference:27]. Let them cool for at least 10 minutes before adding the filling[reference:28].
Step 2: Make the filling
- In a separate bowl, whip the cold heavy cream using a handheld or stand mixer fitted with the whisk attachment. Beat on high speed for about 3 minutes or until stiff peaks form[reference:29]. Set aside.
- In another large bowl, beat the softened cream cheese and granulated sugar on medium-high speed until smooth and creamy, about 2 minutes[reference:30]. Scrape down the sides of the bowl as needed.
- Add the sour cream, lemon juice, and vanilla extract. Beat until fully combined and smooth[reference:31].
- Gently fold the whipped cream into the cream cheese mixture using a spatula. Do this in batches, folding gently to keep the mixture airy and light[reference:32].
Step 3: Assemble and chill
- Spoon or pipe about 2 tablespoons of the cheesecake filling onto each crust[reference:33]. Use the back of a spoon or an offset spatula to smooth the tops[reference:34].
- Refrigerate for at least 3–4 hours, or until the cheesecakes are firm and fully set[reference:35][reference:36].
- Add your favourite toppings just before serving and enjoy chilled!
💡 Pro tip: For the silkiest, smoothest filling, make sure your cream cheese is at room temperature before you start – cold cream cheese will leave you with lumpy filling[reference:37]. Also, use full-fat brick-style cream cheese, not the tub version, for the best texture and flavour[reference:38]. And don't skip the chilling time – at least 3 hours is essential for the perfect set[reference:39]!
❓ Tips & Variations
- Can I make these ahead of time? Absolutely! These mini cheesecakes are perfect for making 1–2 days in advance – just chill and add toppings before serving[reference:40].
- Can I use different crusts? Yes! Try Oreos, Biscoff cookies, digestive biscuits, vanilla wafers, or gingersnaps for a fun twist[reference:41][reference:42].
- What toppings work best? The options are endless! Fresh berries, fruit compote, lemon curd, chocolate ganache, caramel sauce, or whipped cream are all fantastic choices[reference:43].
- Flavour twists: Add lemon zest for a bright citrus kick[reference:44], fold in melted chocolate for a chocolate version[reference:45], or mix in crushed Oreos for a cookies-and-cream twist[reference:46].
- Storage: Store covered in the refrigerator for up to 5 days[reference:47]. You can also freeze them (once chilled) for up to 3 months – thaw overnight in the fridge before serving[reference:48].
- Yield: Makes 24 mini cheesecakes[reference:49].
Creamy, dreamy, and perfectly portioned – the ultimate no-bake dessert! 🧀🍓✨





0 Comments